Submitted by Ingrid of CA
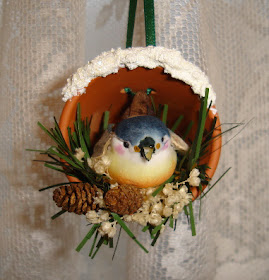
"Birds-in-Pots"
My grandmother used to tell me that finding a bird on our Christmas tree would bring good luck in the new year. When I started making my own crafts, I wanted something different than a bird in a nest or clipped to a branch. It seemed reasonable that a bird might seek shelter in a flower pot so here we are!
Materials:
Terra cotta pot (I used 1+1/2" wide x 1+1/2" tall for this ornament)
Artificial bird
Texture snow (a texture paste that dries to look like snow, usually found in DecoArt, Delta, and other brands)
Tine glitter or an acrylic paint that dries clear and leaves a sparkle look (eg., FolkArt Sparkle)
Narrow ribbon or gold thread for hanger
Assorted bits of trim... berries, tiny cones, dried flowers, moss, artificial pine needles. etc
"Tools" - power drill, small masonry or tile bit, small-sized glue gun, tweezers, scissors, plastic knife
Everything (except the power drill and bits) can be found in a craft store like Michael's or Joann's and you might have some things around the house already.
Directions:
Drill a pair of holes (for the hanger) just below the rim of the pot. Use a slow steady touch with the drill. If you don't want to hang the pot, you can hot-glue a cinnamon stick, some twigs, or bit of greenery just under the rim on one side. Then the finished product will rest on a flat surface without rolling, you can use a bigger pot for more of a tabletop ornament, and you can skip the drilling altogether.
Thread ribbon through the holes and tie to make a hanger.
Apply the texture snow to the rim with a plastic knife. It works best to apply a little at a time. Let dry thoroughly (some brands take about an hour, some overnight). You can leave the snow plain if you prefer but a little sparkle can be added with a light sprinkle of glitter while the paste is still wet or painting over the dried paste with a glitter-type or opalescent paint.
Hot-glue your choice of nesting material into the pot and check how the bird will sit on it. You might need to trim a little of the material out of the middle to make room and depending on the bird, you might need to trim the tail (that no one will see anyway) so it will fit. Apply glue to the base of the bird and hold down in the nest area for a few seconds to firmly set the glue. Apply glue to little bits of trim and tuck in where desired.... this is where the tweezers come in handy!
Enjoy and may your nesting friend bring much good luck.
Return to 1st Annual Homemade Christmas Ornament Contest
Frugal Living Index
Copyright © 2007 by Ingrid. All rights reserved.

