Submitted by Ceci of McKinney, TX
"Creative Snowman"
This is a clever way for using leftover materials you have laying around the house. My sister liked several of these because they came from clothes she no longer wore but associated fond memories with. They can be made for almost nothing.
Supplies:
White fabric (I used fleece), stuffing, beads for eyes and mouth, toothpick, old sweater and twigs.
Instructions:
Body...
Trace 2 circles on to the fabric, one smaller than the other to make the body and head. (I used two water glasses) mark from the inside out where the eyes and mouth will go to where you can see from the other side. I like to hand stitch the eyes and mouth to fabric so I do it at this time before sewing the body. You can hot glue it at the end if you prefer. Next, you sew the body leaving an opening on top of head to turn it inside out and then stuff it. This is when I like to sew a string to the head for it to be hung on a tree.
Hat and scarf...
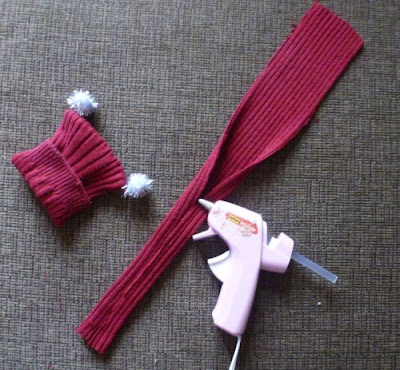
To make the hat, cut the lower part of a sleeve of an old sweater as seen in the picture. Then fold it flat leaving the seam in the middle, sew it across, turn it inside out and fold the bottom to make the brim. Then place it on the head. I use a crochet needle to fish out the string through the hat so is hanging outside. Cut a strip of fabric from the leftover part of the sleeve to make the scarf. Fold the sides in as shown in the picture (see photos below) and be careful to use very little glue so it doesn't show through. Wrap the scarf around the neck and glue it in place once completed glue the hat in place next.
Arms...
For the twig arms poke a hole with a seam ripper and insert them into the body and glue them in place. For the nose I simply used a toothpick cut in half and inserted the sharp end into the fabric twisting it back and forth until in place.
At this time add some finishing touches such as buttons to the belly, blush on the cheeks and pompoms on the hat.
You can also add beaded legs and arms using jewelry string. I usually do it before stuffing it so I can knot the string to the inside.
Variations are endless so play around with whatever items you happen to have laying around; buttons, broken jewelry, beads, etc.
Return to 5th Annual Homemade Christmas Ornament Contest
Frugal Living Index
Copyright © 2011 by Ceci. All rights reserved.
Our next budgeting class will begin JANUARY 10th, 2022. Register here...
Can't find the page you're looking for?
Free Membership and Ebook Bonus Gifts:
Sign up today and receive 2 ebooks (Dealing with Debt and 101 Coupon Tips) with your Free Membership. The Ebook gifts will be included in your Welcome letter! :o)
"It's not about being able to spend more money.
It's about enjoying and managing what you already have... BETTER!"
- Michelle Jones, Founder of BetterBudgeting
Living a Better Life® is a registered trademark and Better Budgeting a trademark of BetterBudgeting.org, and it's parent company, Blue Ridge Publishing, Inc., PO Box 795, Powder Springs, GA 30127.
Follow Us:


