Submitted by JT
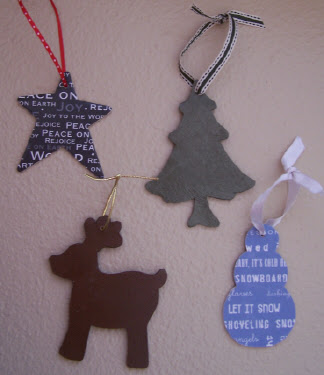
"Wooden Christmas Ornaments"
This is one of my favorite homemade ornaments because they turn out really cute and are fairly inexpensive. They are quick, easy and fun to make. My three year old even had fun helping me.
Materials:
Wooden die cut (found at Michael's craft store)
Decorative paper
Ribbon
Scissors
Pencil
Mod Podge
Paint Brush (1/2”)
Wooden hand drill (found at Michael's craft store)
Glitter (optional)
Other embellishments (optional)
Instructions:
Take your wooden die cut and trace it onto your paper.
Cut the shape out two times (one for each side of the die cut). If your die cut is not symmetrical trace and cut both sides.
With your paint brush apply Mod Podge on one side of the die cut.
Apply the paper to the die cut.
Apply Mod Podge over the top of the paper. ( If you are going to apply glitter to your ornament – this is the time to do it.)
Let the Mod Podge dry.
Repeat steps 3-6 for the opposite side.
After the entire ornament is dry, drill a hole where you would like to hang the ornament from.
Cut your ribbon to a length that you choose and tie.
If you choose to apply any other embellishments – now is the time to do that.
Now go hang it on your tree or tie onto your gifts. ENJOY!
Return to 1st Annual Homemade Christmas Ornament Contest
Frugal Living Index
Copyright © 2007 by JT. All rights reserved.
Our next budgeting class will begin JANUARY 10th, 2022. Register here...
Can't find the page you're looking for?
Free Membership and Ebook Bonus Gifts:
Sign up today and receive 2 ebooks (Dealing with Debt and 101 Coupon Tips) with your Free Membership. The Ebook gifts will be included in your Welcome letter! :o)
"It's not about being able to spend more money.
It's about enjoying and managing what you already have... BETTER!"
- Michelle Jones, Founder of BetterBudgeting
Living a Better Life® is a registered trademark and Better Budgeting a trademark of BetterBudgeting.org, and it's parent company, Blue Ridge Publishing, Inc., PO Box 795, Powder Springs, GA 30127.
Follow Us:


